
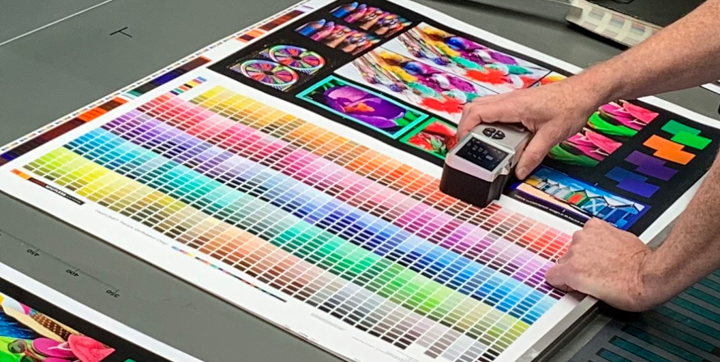
What is Expanded Gamut
Before we get too deep into a discussion of expanded gamut, it is important to define what expanded gamut is. Basically, it’s seven-color process printing: Cyan, Magenta, Yellow, Black with the addition of Orange, Green, and Violet. It’s also referred to as Extended Gamut, Hi-Fi Printing, and Fixed Pallet Ink Set. A few of the questions are: Why do it? What’s needed to do it? How to do it? It’s been said that EG seems to point to the quality aspects of the process while Fixed Pallet Ink Setpoints to the economic aspects.
Currently, there are numerous terms used to describe expanded gamut, such as:
- Expanded gamut
- Extended gamut
- ECG
- 6 or 7 color process
- Multicolor
- N-color
- Hi-fi printing
- Fixed palette ink set
By its very nature, the term expanded gamut indicates a reference point. In order to determine if a gamut is ‘expanded,’ we need to have something to compare it to. It is generally accepted that expanded gamut is relative to the standard colorspace gamut used for CMYK printing, such as GRACoL. A print condition is considered an expanded gamut when the gamut of the colorspace exceeds GRACoL or other ISO 12647-2 colorspaces. Based on this definition, an expanded gamut print condition is not dependent on whether you are using 4, 6, or 7 inks, but instead requires that the colorspace has a gamut that exceeds GRACoL or other ISO 12647-2 colorspaces.
Why Expanded Gamut? Why do it?
There are several reasons for considering Expanded Gamut Printing, but most of them fall into two categories: financial and quality. How to be more profitable and how to print higher quality images in labels, and flexible packaging. With the rising costs of substrates, inks, plates, etc, and buyers from the companies you sell to demanding lower prices and shorter lead times, it’s becoming harder and harder to make a profit or, worse, stay in business. Since external factors such as the cost of the substrate, petroleum prices, etc are out of your control then the factors that you do have control over are the internal ones. This is where we’ll focus: how to become more efficient and profitable with the help of Expanded Gamut printing. Since efficiency and cost savings go hand in hand, how can Expanded Gamut help? There are compelling reasons to consider an expanded gamut. Some of these reasons are related to print quality, and others are related to cost savings. Colorspaces like GRACoL and Fogra are well established and offer cost-effective ways to print, but some customers have print requirements that exceed what can be accomplished using standard colorspaces.
One reason to use expanded gamut printing is to produce eye-catching graphics that cannot be created using standard print spaces. Many consumer products that are purchased in retail environments fall into this category. Using a design that is more vivid and colorful than traditional packaging increases the likelihood that a consumer will notice and select the product. For many brands, this alone is a reason to consider moving to expanded gamut printing.
Here are some examples of printing methods that can achieve an expanded gamut:
- CMYK inkjet
- Hexachrome (CMYKOG)
- CMYKOGV
- CMYK Litho with high-density inks
- Digital press
Key Benefits!
Ink Savings – The average printing shop has numerous liters of ink on their shelves that are half-used or used for certain jobs with special colors. Sometimes there can be hundreds of liters of ink in inventory that aren’t making you any money. With Expanded Gamut, you only need seven colors.
Fewer anilox rollers – With Expanded Gamut, since you are only running seven colors you can reduce the number of anilox rollers needed. While you’ll still need a few extra rollers for coatings, opaque whites, and line colors that are outside of the gamut range, your anilox inventory can be significantly reduced.
Reduced wash-ups – Since you are mainly running the same seven colors you will no longer have wash-ups between job changes. Not only will this reduce your set-up times for the next job, but it will also allow you to run more jobs and increase capacity. Essentially you will only have plate changes.
Material savings – With Expanded Gamut, once you have standardized your process you will no longer have to use your press as a very expensive ink proofer. Matching colors on the press is one of the biggest culprits of wasted time and wasted substrate. If you consider just the material savings alone this is more than enough reason to seriously consider Expanded Gamut Printing.
Higher quality – Now we will focus on how Expanded Gamut printing can help you produce higher quality images. The printing you are able to print a greater range of colors due to the ability to hit a larger color gamut (Expanded Gamut). With a four-color process, flexographic presses can match approximately 50 percent of the Pantone book, while Expanded Gamut Printing can match 75 percent or more. A common question that’s asked is: ‘Is it worth adding three more colors for only 25 percent more?’
CMYK expanded gamut
When many people think about expanded gamut they automatically think about 7 color process printing – but expanded gamut does not necessarily require 6 or 7 colors of ink. Examples of expanded gamut printing that use only 4 colors are inkjet and digital printers, as well as some flexo and gravure ink sets. Expanded gamut does not refer to how many inks, or the number of units, but the expansion of gamut. (A print condition is considered expanded gamut when the gamut of the colorspace exceeds GRACoL or other ISO 12647-2 colorspaces.) Many devices can achieve an expanded gamut without the use of additional inks. In the sign and wide format market, many devices are run with no color management (or sometimes custom color management) to take advantage of the full gamut of the device. For these devices, an expanded gamut is a natural part of how the machine prints. For other devices like offset lithography, CMYK expanded gamut can be obtained by using special inks, or by increasing ink film thickness.
There are two commonly used colorspaces for CMYK expanded gamut:
XCMYK is an expanded gamut color space for use with digital and traditional print. The XCMYK color space based on high-quality sheet-fed offset printing using standard IS0 12647-2 compliant CMYK inks run to higher than normal levels, with nontraditional screening. The XCMYK color space can be reasonably approximated on any suitably adjusted offset press without a custom ICC profile and can be simulated on other printing systems with equal or greater native color gamut, by ICC methods. XCMYK is part of Idealliance’s Expanded Gamut Project. The XCMYK research was conducted by the GRACoL Committee over a 15-month period in 2015-2016 and involved 26 offset test runs held in the US, Canada, China, Korea, Pakistan, Taiwan, and Singapore. The colorspace was also tested with a wide variety of digital printers. One of the benefits of the XCMYK profiles is that while it works easily with digital printers through the use of the ICC profile, the same colorspace can also be printed on offset lithography. The relationship XCMYK has between digital and traditional print is designed to give printers and buyers a common space linking wide format digital and traditional print methods. XCMYK can be downloaded from www.gracol.org. A detailed report on XCMYK and gamut analysis is available in the same URL/location.
Multicolor expanded gamut CMYKOGV, Hex, Custom
For offset litho, a typical way of producing expanded gamut consists of using process inks together with the addition of multicolor inks. The multicolor inks are mono pigment inks. Monopigment inks result in a higher chroma than inks blended from multiple pigments. A typical configuration for a multicolor print condition might be C, M, Y K, O, G, V (Cyan, Magenta, Yellow, Black, Orange, Green, and Violet) if seven colors are available or CMYKOG if only 6 colors are available. While there is no history of expanded gamut print standards, one of the closest available efforts was Pantone’s Hexachrome. Hexachrome was developed and announced in 1996 and offered the promise of matching approximately 90% of the Pantone library. While Hexachrome was widely promoted, and many printers tested it with good results, it was not widely used at the time. Additional proprietary expanded gamut methods used by brands and print service providers include C, M, Y, K, O, G, V, which also has been shown to be capable of achieving 90% of the Pantone library. Most current multicolor expanded gamut systems refer to C, M, Y, K, O, G, V. The number of colors to use for expanded gamut is dependent on the colors selected as targets, as well as substrate and printing machinery.
Most current multicolor expanded gamut systems refer to C, M, Y, K, O, G, V.
Multicolor expanded gamut calibration methods
While there are no multicolor expanded gamut standards available, there is a common method used by many who perform multicolor expanded gamut calibrations. Most experts aim their CMYK channels to GRACoL aims and calibrate the CMYK using G7. For the OGV channels, they run to ink company recommended aims and rotation, and calibrate using linear DeltaE-to-Paper for spot color tonality. (In the future, this will be changing to CTV based in Schmoo/ISO 20654).
Once calibrated, the results are measured and recorded for use in proofing and separation. The exact charts and measurement methods vary, depending on the software and tools used, but the measurements record the characterization data for the entire multicolor profile.
Because there is no industry standard for multicolor expanded gamut, the method of calibration is important. If done correctly the calibration can be repeated across multiple presses, or the same press at a future date when conditions have changed. Until there is an industry-standard calibration for multicolor expanded gamut, each new instance of calibration involves creating a custom standard. There is a variety of software and tools available for calibration, and a list of the most common of these is included later in this document.
Multicolor calibration can be done with as little as curve creation software, ICC profiling software, and a proofing engine that supports multicolor profiles or can also be done using an advanced suite of tools that simplify the creation and conversion of files into the multicolor space.
Expanded Gamut and Screening
In addition to using standard process and OGV mono pigmented inks, most expanded gamut print benefits from the use of stochastic screening. Because of the way stochastic screening carries ink it can give the appearance of fullness and will increase the gamut in the highlight and mid-tone areas beyond what would be achieved using traditional am screening.
The look achieved on litho when using FM screening is similar to the look of gravure or flexo when compared to typical litho output. Stochastic screening is more complex to print and control than AM screening, and this adds one more layer of complexity to printing expanded gamut. (For printers who do not have good press control, FM screening is more challenging).
While it is possible to print expanded gamut with AM screening, the results are much better and gamut is increased more when using FM screening. Some print methods also use Concentric screening for the same effect.
What’s needed to do it?
Now that you are considering Extended Gamut printing you will need to determine if your existing equipment is up to the challenge. Here are several things you need to verify before you get too far into the journey.
Registration – Depending on the line screen that you intend on running you will need to determine what register tolerances your press is capable of holding. Since you are building spot colors with half-tone dots you need to hold a tighter register to prevent shifts in color. Ideally, you should be able to hold a .002 (.05 mm) register for tighter Delta-E control.
Color management – You will need to determine how well your press can maintain density at running speeds and throughout speed changes. To be able to maintain tighter and more consistent color matches, verify with a densitometer that your density stays within a few points.
Impression settings – Verify that you can print with an even impression on both sides of the web. With a densitometer, you want to be at 3 percent or less from one side of the web to the other. Also, check that you maintain impressions at different press speeds and that your impression comes back consistently during starts and stops.
Drying/curing – Typically wide web presses use solvent-based inks on a central impression drum but narrow web, inline presses use UV inks. UV inks are more consistent and are easier to maintain and are recommended for Expanded Gamut printing. Verify that your lamps are curing properly at production speeds.
Once you have determined if your existing equipment is capable of Expanded Gamut printing, or you need to invest in a new press, then the next question is:
How to do it?
Before going to press with the Extended Gamut process, a thorough evaluation of several things needs to be performed to achieve an acceptable end result. The first step in the evaluation process is:
Optimization
During optimization you will need to identify:
- Substrate(s) Plate
- DPI/LPCM
- Ink system
- Plate material l Mounting tape l Anilox rollers
Banded anilox test – One of the best methods for selecting anilox rollers is a banded anilox test. A banded anilox roll has multiple engraving bands across the roll that consist of different line screen counts and volumes. Typically there are five engraving bands on a narrow web test. Once you have worked with your anilox supplier and determined the cell count/volumes that you want to test, and the banded roll has been made, then you will do a print test. The print test consists of a photopolymer plate that has tints, solid targets, etc. that have been designed to match the engraved bands of the anilox roll. Please refer to the image above
Ink set – The inks that are chosen for the Expanded Gamut process are not typical process inks. The CMYK colors have to hit a Delta-E value of 5 or less to be compliant with the G7-ISO L*a*b* ink color standards. The OGV inks need to be mono pigmented and need to fall within the proper hue angles of Flexographic Image Reproduction Specifications & Tolerances (FTA-FIRST) while achieving the most chroma.
Plate package – To achieve the highest level of print quality the durometer of the plate in combination with the best compressibility of mounting tape (plate package) needs to deliver the smallest highlight dot while achieving the optimum Solid Ink Density (SID).
Note that for best results all of your testings need to be done at production press speeds. You will also need to repeat the tests on each substrate you will use.
Fingerprint test – After the optimization is complete a fingerprint test will be performed to help determine the print characteristics of the press. The purpose of the fingerprint is to:
- Linearize the press to an industry-standard such as GRACoL/G7
- Neutralize press for gray imbalance
- Produce neutral print curves
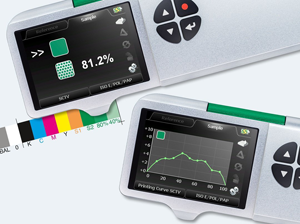
To be able to achieve repeatable results during production runs, the fingerprint must be run under normal conditions, at production speeds, using virgin ink along with clean anilox rollers. During the fingerprint, a spectrophotometer will be used to measure color and densities as well as check for even plate impression, which needs to be three percent or less from the operator side to the gear side of the press.
After the fingerprint data is collected and extrapolated, a near-neutral curve will be applied to the seven colors and added to the profile target.
Profile test – After the fingerprint test is complete, the next step in the EG calibration process is profiling. The profile test will use a set of plates with the curve applied from the fingerprint. Note that the profile test must be printed under the same conditions as the fingerprint trial.
The profile target used is an IT8.7/4 consisting of 1,638 patches of different CMYK color combinations for overprints. Images are added to the test form as well to help validate the proof. First, run the target plates in the CMYK stations to create a traditional CMYK profile.
Next, place the cyan plate into the orange station and run the target with MYKO. Put the cyan plate back into the cyan station and place the magenta plate into the green station and run the target with CMYK. Put the magenta plate back into the magenta station and place the yellow plate into the violet station and run the target with CMVK.
Once the four data set combinations have been run and the information is extrapolated, the Expanded Gamut profile is ready to be validated. After validation of the data is complete, conversion of screen builds into spot colors can be accomplished through prepress software. Once the EG separation is complete you will be ready to go to production.
About the Author:
Mohammed Abdul Haleem
Email: packagingprinting@consultant.com
With almost 27 years of experience in the printing industry, he offers proactive recommendations on anilox roll specifications, flexographic printing sleeves, testing, inventory management, flexographic equipment applications, training, representation from experience in technical sales, marketing, production, technical service, parts, and supplies. His experience covers the spectrum of flexographic markets including wide web flexible packaging, narrow web, tag & labels, foil, folding carton, corrugated packaging applications.