
The most important factors for success in printing halftone and process colorwork. It allows control of the hue of
secondary colors (reds, greens, and blues), dot gain, trapping, ink consumption (mileage), and a number of other factors
important to both quality and cost.
Factors that influence ink film thickness include:
- Cell count and cell configuration of the anilox roll.
- Type of ink metering system (doctor blade or two-roll).
- The hardness of ink metering roll.
- The pigment concentration in the ink formulation.
- The viscosity of the ink.
- Running speed of the press.
These factors usually act in combination to influence the ink film thickness.
Ink Film Thickness
A question that is often asked is: When printing process color, how thick should each process ink film be? In theory, the
thicker the film the more saturated the color. In practice, however, a point is reached beyond which spaces between halftone
dots begin to fill in (because of excess ink), and light colors begin to look “dirty.” Control of ink film thickness is usually based
on measurements made with a reflection densitometer.
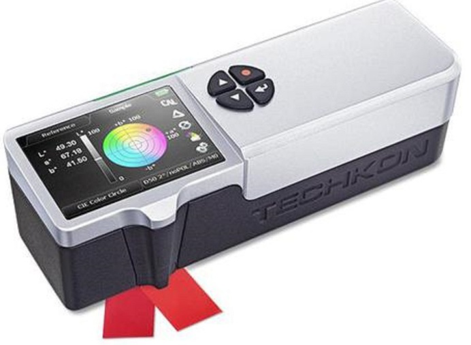
Using the Reflection Densitometer
The easiest way to determine ink film thickness is to measure its reflection density with a densitometer. A reflection
densitometer assigns a numerical value to ink density. The higher the number, the thicker (denser) the ink film.

Ink Density Targets
Experience shows that the following ink density targets are good starting points for printing on gloss coated enamel paper.
Process Color Ink Density Range
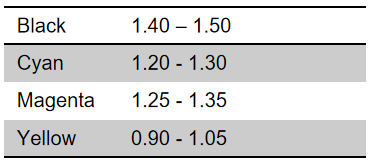
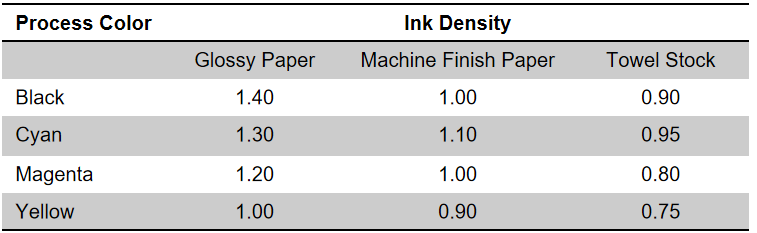
These are valid starting points for gloss coated enamel paper, but we recommend that each printing operation establish its own targets that give the best results. When printing on polyethylene film or other non-absorbent glossy substrates, solid ink density will be much higher than the ink density ranges listed above due to the extremely high gloss and efficiency of the substrates. Transparent, non-absorbent substrates should be placed on a white poster board before taking density measurements.
Ink Density Control Limits
Upper and lower density limits for each process color should be established during production planning. A specified range of ±0.05 density units is considered an acceptable variation in maintaining control of ink film density. It must be remembered, however, that changes in reflection density indicate only that ink film thickness is changing, not why it is changing or how to correct it. It is the press operator, drawing on knowledge and experience, who must decide if a change in density is to be compensated for by adjusting ink viscosity, changing the anilox roll, or changing press speed.
Process Inks
The three primary process ink colors are cyan, magenta, and yellow. Ideally, each absorbs one-third of the light and reflects two-thirds.
- Cyan ink absorbs red light and reflects blue and green. A complimentary red filter is used to measure cyan ink density, making it appear black to the densitometer.
- Magenta ink absorbs green light and reflects blue and red. A complimentary green filter is used to measure magenta ink density.
- Yellow ink absorbs blue light and reflects green and red. A complementary blue filter is used to measure yellow ink density.
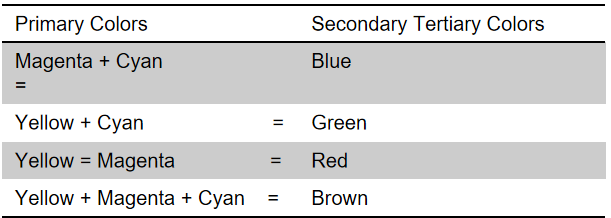
- Black ink is measured through a special visual filter that matches the peak sensitivity of the human eye. To Primary Colors print full-color reproductions, the secondary and tertiary colors are created by overprinting two or three of the primary colors.
Establishing and Maintaining Ink Densities
To establish and maintain ink densities you must print color bars that can be measured by your reflection densitometer. The bars must contain solid and tint patches of both the primary and overprint colors. Each patch must be large enough to be measured by your densitometer.
A useful selection guide to color bars is Test Images for Printing, published by Graphic Arts Technical Foundation, 200 Deer Run Road, Sewickley, PA 15143-2600.
We are often asked: What ink densities are best? There is no single answer for every case. Too much ink will cause excess dot gain while too little ink will cause weak, washed-out colors. Experience shows that the following ink density targets are a good starting point (see table below).
Ink densities must be adjusted for each primary process color so that overprinting produces good reds, greens, and blues. Each overprint tint patch must be measured with the applicable complementary color filters.
When measuring the red overprint patch, the blue filter density should not exceed 80% of the green filter density.
A good green overprint patch will produce red and blue filter densities that are nearly equal. The blue overprint patch should give nearly equal red and green filter densities.
The three-color overprint should appear a deep chocolate brown. Trapping—Establishing and Maintaining Secondary Colors
Trapping is the ability of one ink to print on top of another ink. You must have consistent trapping to establish and maintain secondary colors.
There are two types of trapping problems in flexo printing; under-trapping and overlapping. Under-trapping is caused by incomplete drying of the first- down color prior to printing the second-down color, or by excessive plate-to-substrate pressure of the first-down color.
Over-trapping can be caused by the first-down color acting as a sizing on the substrate so the second-down color appears denser than if printed on bare paper.
Trapping is computed by taking density readings of the first-down color, the second-down color, and the overprint color through the complementary color filter of the second-down color. The three density measurements are plugged into the following formula:
overprint density – first –down density
Second-down density x 100 = percent trapping
For flexo printing, typical trapping values are in the range of 80%-100%. Once trapping values are established for a particular job, these readings should be maintained throughout the press run.
Sharpness
Printing sharpness is an indication of how well a printing process can reproduce and maintain detail. Because of mechanical differences in printing decks and differences in the flow properties of printing inks, sharpness will vary from color to color. Therefore it is important to determine the sharpness for each color.
Sharpness is calculated by taking density measurements of a solid patch and a middle-tone tint patch of color and plugging them into the following formula:
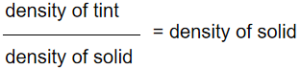
The sharpness value is a relative number and there is no specific number to be used as a guideline. However, once satisfactory printing conditions are achieved, the sharpness number must be maintained throughout the press run.
Slur
“Slur” is the loss of sharpness in the web direction caused by mechanical problems in the press, such as printing with plates off of pitch line or with worn gears. Slur, like sharpness, is a relative number. It is the ratio between the densities of two straight-line tints, one printed in the direction of web travel, and the other printed across the direction of web travel. If there is no slur, the two tint patches should have equal density.
Printing Process Color
When you can establish and maintain the right ink densities of primary and secondary colors, you are well on your way to printing process color with consistently high quality.
Author: Mohammed Abdul Haleem
Email : packagingprinting@consultant.com
With almost 26 years of experience in the Printing Industry, he offers proactive recommendations on Flexographic Printing plates, Anilox roll specifications, testing, inventory management, flexographic equipment, training, drawing from experience in technical sales, marketing, production, technical service, parts, and supplies. His experience covers the spectrum of flexographic markets including wide web film, narrow web, tag & labels, foil, folding carton, corrugated packaging applications