
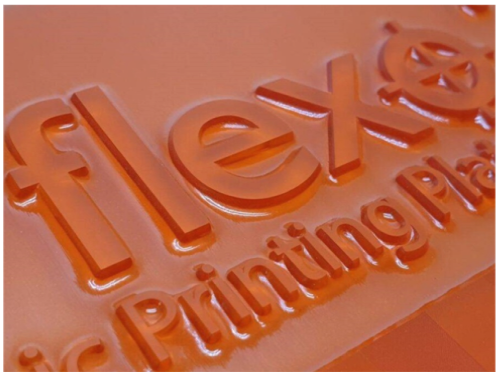
What are Photopolymers ?
Photopolymers are imaging compositions based on polymers/oligomers/monomers which can be selectively polymerized and/or crosslinked upon image-wise exposure by light radiation such as ultra-violet light.
For final use, they are made into different forms including film/sheet, liquid, solution etc, which find outlets in printing plates, photoresists, stereolithography/ 3D printing and imaging.
Photopolymer formulations comprise of polymers, oligomers, monomers and additives.
Polymer bases for photopolymers include acrylics, polyvinyl alcohol, polyvinyl cinnamate, polyisoprene, polyamides, epoxies, polyimides, styrenic block copolymers,nitrile rubber etc.
They may be used along with oligomers, monomers and additives.
Polymers usually function as binders and determine processing characteristics as well as final physical properties of cured photopolymer compositions.
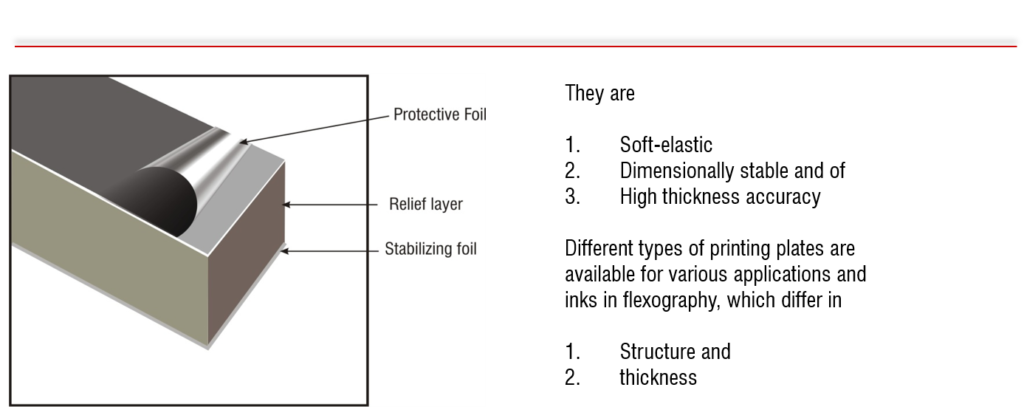
Structure of the Plate
General introduction to Photopolymer plate processing :
Exposure of an unpolymerized flexo plate to ultravoilet light (UVA light in the wavelength range of 360 nm) causes macromolecules by polymerization.
This cross-linked macromolecules pervade the flexo layer, making it in soluble to wash-out solvents.
No polymerization, however, occurs in the unexposed parts which are then removed from the plate by means of wash-out solvent.
This process produces an exact printing relief.
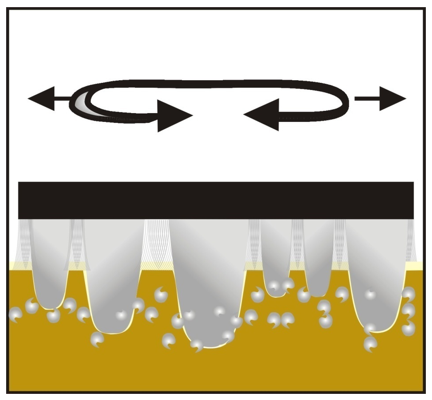
Effect of Plate back exposure:
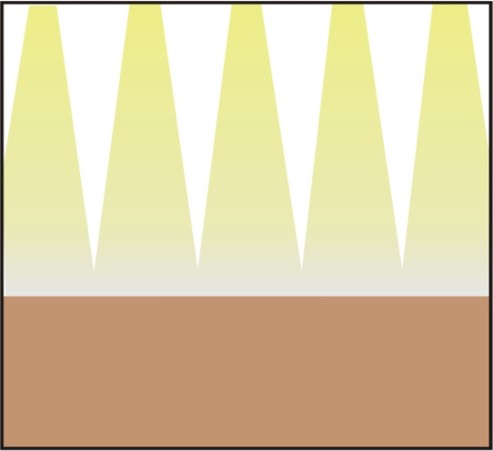
FIRST : Back exposure
Effect of plate-back exposure
The first step in platemaking is pre exposure through the plate back, without vacuum.
- Makes the layer more sensitive to light by using up the oxygen contained in the raw plate.
- Ensure a strong shoulder structure.
- Improves relief anchoring to the lower layer.
- Limits the wash-out depth.
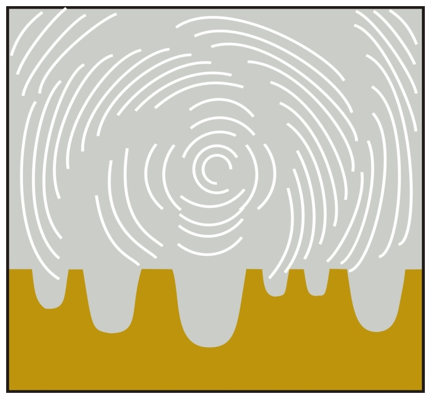
Effect of Main Exposure:
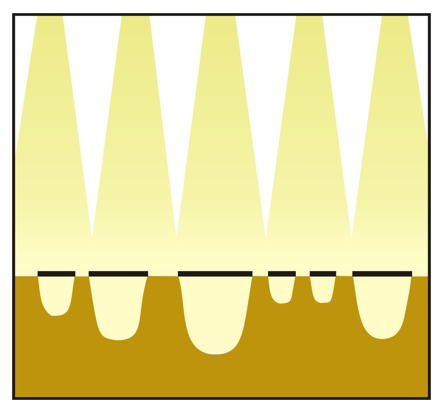
SECOND : Main exposure
Effect of Main exposure
The main exposure is done through the negative,with the light penetrating the plate from the layer side. During main exposure,the relief is formed by photopolymerization.
The details-lines,letter,halftone– are reproduced according to the transparent part of the negative, and cannot be influenced later on.
The main exposure time depends on:
- The sensitivity of the plate batch.
- The quality of the negative film.
- The type and condition of the exposing unit.
- The length of the plate-back pre-exposure (relief depth)
To determine the appropriate mail exposure time, a test exposure has to be carried out.
The length of main exposure influences:
- Dot anchoring.
- Shoulder angle
- Intermediate depths.
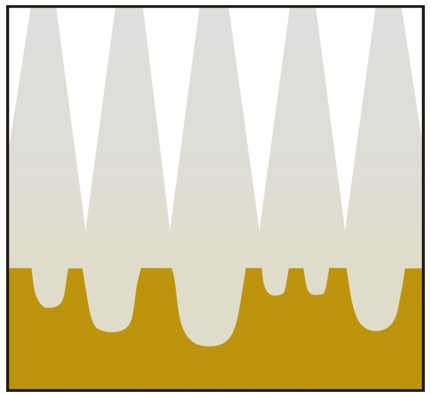
Effect of Washout:
THIRD : Wash-out
Effect of Washout
Those parts of the plate which have not polymerized are dissolved and removed by means of solvent during the wash-out process. The process is supported mechnically by brushing.
- The relief depth is determined by the combined action of wash-out time and back pre-exposure.
- The washout time must always be restricted to a minimum. The relief swells slightly during wash-out. The swelling intensifies the longer the plate is in contact with the solvent.
- If the wash-out time is greatly exceeded or an unsuitable wash-out solvent is used, relief elements may become detached or damaged. The optimum wash out time is determined by testing.
- The suitable wash-out solvent which are environment friendly available with most of the plate manufacturers.
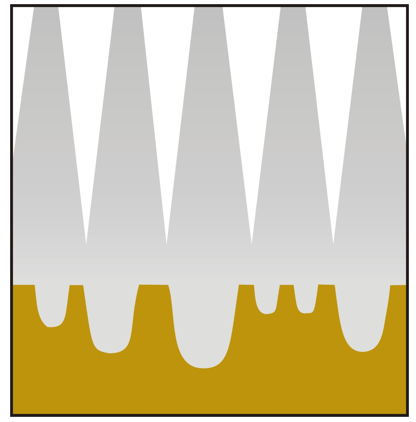
Effect of Drying:
FOURTH : Drying
Effect of Drying
The wash-out solvent which has penetrated into the relief layer is evaporated during the drying process. Maintaining the specific drying times and a uniform temperature across the whole plate is essential.
After drying, all the Photopolymer plates require a resting period of approx. 10 – 12 hours at room temperature to ensure a complete return to the correct dimensions of the unprocessed plate.
Deviations in thickness may occur if the resting period is shortened and post-exposure or after treatment started too early.
Effect of Post Exposure:
FIFTH : Post Exposure
Effect of Post-exposure
Post-exposure means exposing the total plate without film.
- Depending on the kind of image matter – solids, fine lines and dots – the main exposure will allow more or less light to affect plate. As a result, there will be parts in the relief that are less polymerized than others.
- Postexposure causes these parts to become completely cross-linked. This gives the plate consistent properties.
- The final plate hardness is achieved only with sufficient postexposure.
Postexposure is done prior to light aftertreatment. For post-exposing, the plate is placed in the exposing unit where its face is exposed to UV light without vacuum foil. Choose the same length of time for postexposure as for main exposure. This lets you be sure that the plate thoroughly polymerized and can develop its optimum qualities in hardness, elasticity, solvent resistance and cracking resistance.
Effect of Light After treatment:
SIXTH : Light Aftertreatment
Effect of Light Aftertreatment
After treatment ensures that the relief layer loses its tackiness.
- Aftertreatment by exposure with UVC light. UVC light aftertreatment means the advantage of easier Processing than is possible with chemical aftertreatment for different types of plates.
- Cracks will also result if UVA/UVC light aftertreatment is carried out simultaneously, and the temperature in the light aftertreatment unit rises too high.
Exposing the flexo plate to short wave UVC light removes the stickiness from the plate surface. In this process, the plate does not become matt, but remains glossy, so that the results of UVC light aftertreatment cannot be monitored visually; it can only be felt.
Wash-out test
- Trim not yet pre-exposed plate material to pieces about 12 X 17 cm (0.472 x 0.67”) in size.
- On each piece of raw plate, place a covering plage, expose full-face for 10 minutes.
- Wash the plate pieces in the continuous flow washeer, using different flow times e.g: 3 min for the first piece, 6 minutes for the second, 9 minutes for the third, 12 minutes for the fourth.
- The plate segments must be dried for about 15 minutes ( a drying time which applies only to this test)
- After drying, measure the thickness of the wash-out parts.
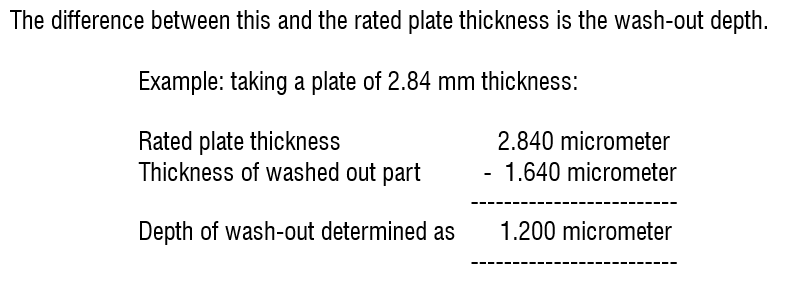
As the optimum wash-out time the point at which the desired relief depth is exceeded by 0.2 mm (0.008”).
If a relief depth of 1 mm is desired, for example, you choose the wash-out time that produced a wash out depth of 1.2 mm.
The diagram (Figure: Wash-out curve) in the next page, shows the relationship between relief depth and wash-Out time.
The values indicated represent the difference between the originally measured raw plate thickness and the remaining thickness of the washed-out plate segments
The curves showing wash-out can only be regarded as examples.
Since the relationship Between wash-out time and washed –out relief depths differs according to the type of Washer and plate, all products have to be test-determined accordingly.
Wash-out Curve
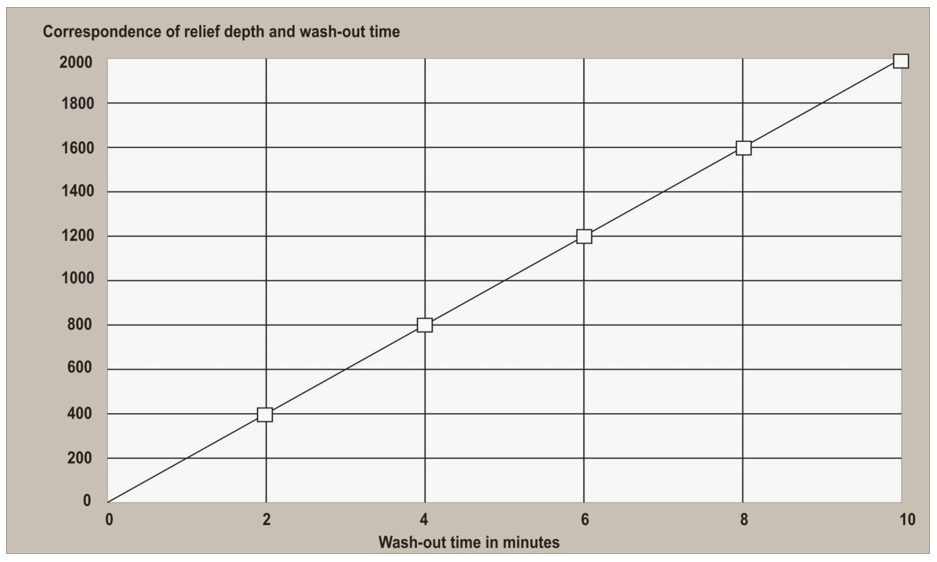
Plate-back / pre-exposure test
- First of all, cut a flexo plate to a size of approximately 20 X 48 cm, and place it on the vacuum plate of the exposing unit with the relief layer facing downwards. Plate face and back are easily told apart by trying to lift one corner of the foil. This is possible only with the protective foil However, for the time being, the protective foil has to remain on the plate. Vacuum is not required for the pre-exposure test.
- To avoid reflection, it is advisable to use a suitable base material in pre-exposure and main exposure (example: black board, red plastic sheet)
- Before exposing, cover the plate with pieces of opaque material the size of the test sections of the test negative. Keep the first field covered throughout; step exposure begins with the second field.
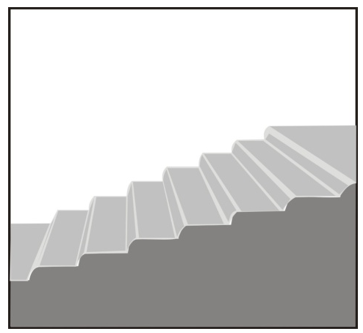
Profile of test plate from different pre-exposure times
Next, wash the exposed plates for the length of time previously determined as necessary for the desired relief depth. For measurement of the different steps, it is essential that the plates are subsequently dried for approximately 15 minutes.
The forgoing reveals the interrelationship between pre-exposure time, wash-out time and relief depth:
- Long pre-exposure and short wash-out time = shallow relief
- Short pre-exposure and long wash-out time = deep relief
The relief depth shoud be chosen according to the following criteria:
- Screen or line
- Printing stock and
- Press conditions
Fine-screen work, especially one with gradation, is more easily reproduced with a shallow relief ( e.g.: 0.7 mm) since a deeper relief will lead to dot loss.
Stock that is uneven, rough and maybe linting requires a deeper relief.
Plate-back pre-exposure has to be carried out for each new batch of plates.
Main Exposure test
- For this test, trim a flexo raw plate to 20 x 48 cm size.
- Pre-expose the back for the length of time determined by your tests.
- Turn the flexo plate over (relief upwards) and remove the protective foil. Lay the flexo plates test negative on the plate, matt emulsion side down.
- Cover the edges of the flexo plate with profile foil strips to ensure perfect vacuum and prevent the vacuum foil from sticking to the cut edges of the plate.
- Now switch the vacuum pump on and unroll the foil over the plate, pulling evenly. For quick removal of entrapped air, it is advisable to roll-squeegee the vacuum foil or wipe it with an antistatic cloth.
- This will make any enclosed dust particles located in transparent fil area visible. These particles must be removed to prevent exposure faults.
Note : Most of the flexoplates test negatives contain four identical strips of test elements.
They are available with every plate manufacturers. - The test elements of the test negatives serve to determine the main exposure time and the exposure latitude.
For plate thickness of 0.76mm to 3.18 mm and above.
- These times are only meant as rough guides to illustrate the principle. They may be increased or decreased according to plate type. The exposure time depends on the nature of the image to be printed and on the type and technical condition of the exposing unit used.
- The UVA tube type (Phillips or Sylvania brands) is another important factor.
- The output of the tubes decreases with prolonged use, as does the light-transmitting capacity of the vacuum foil. In either case, the necessary exposeure time increases. For these reasons, exposure tests have to be carried out from time to time and whenever changing plate batches.
- After exposure, wash and dry the plate. The exact exposure time can be seen from the different relief results.
Important note
For plate processing, always select the times close to the upper exposure limit, and select the same times for postexposure.
This will ensure that the plate is properly polymerized, and develops its optimum hardness, elasticity, solvent resistance, and resistance to cracking.
Exposure Latitude
Under exposed steps show over-washed halftones and wavy lines.
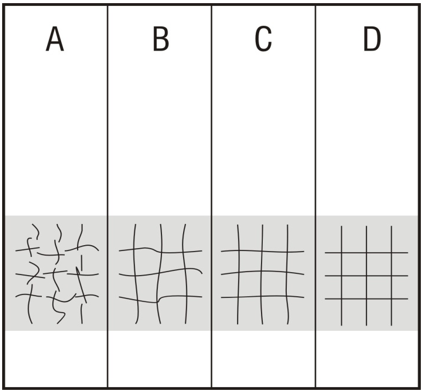
Effect of different exposure times on a line grid
The time period between the lower and upper exposure limit is called the “exposure latitude”. In the case of flexo plates, this latitude is large.
For example :
Lower exposure limit 8 minutes
Upper exposure limit 12 minutes
Exposure latitude = 4 minutes
Within the exposure latitude, the surface diameters/widths of the dots and lines do not change. Exceeding the upper limit means overexposure.
In this case, reverse elements in solids are endangered the most: the intermediate depths will be too shallow. Fine lines and grids will not be affected.
Drying & Checking times
The washed-out flexo plates is dried by a hot-air fan in a drying cabinet. The following is an overview of the drying times.
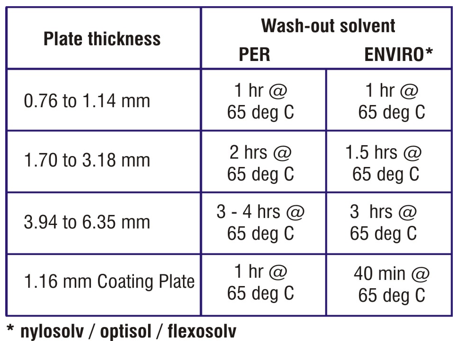
These times are minimum values, the stated temperature is the maximum. If lower temperatures are used, the drying times have to be increased accordingly.
The drying process should be checked after 15 minutes. Solvent residue or streaks are to be wiped off using linen cloth or chamois soaked with fresh wash-out solvent.
Allowing the plates a rest period of 12 – 15 hours gives them maximum tolerance precision, and is to be recommended.
Drying times
Like all photopolymer products, freshly processed plates will shrink within a time period of max. three months. The layer thickness of the plate exhibits a mean decrease of 10 to 15 micrometer, and finally reaches its final condition. This shrinkage is at its most marked immediately after plate processing. Layer thickness measurements taken at different times show different results.It is accordingly unwise to combine older plates with freshly processed ones in a single printing forme; the freshly processed plate will always be thicker than the older plate.
About the Author:
Mohammed Abdul Haleem
Email: packagingprinting@consultant.com
With almost 27 years of experience in the printing industry, he offers proactive recommendations on anilox roll specifications, flexographic printing sleeves, testing, inventory management, flexographic equipment applications, training, representation from experience in technical sales, marketing, production, technical service, parts, and supplies. His experience covers the spectrum of flexographic markets including wide web flexible packaging, narrow web, tag & labels, foil, folding carton, corrugated packaging applications.